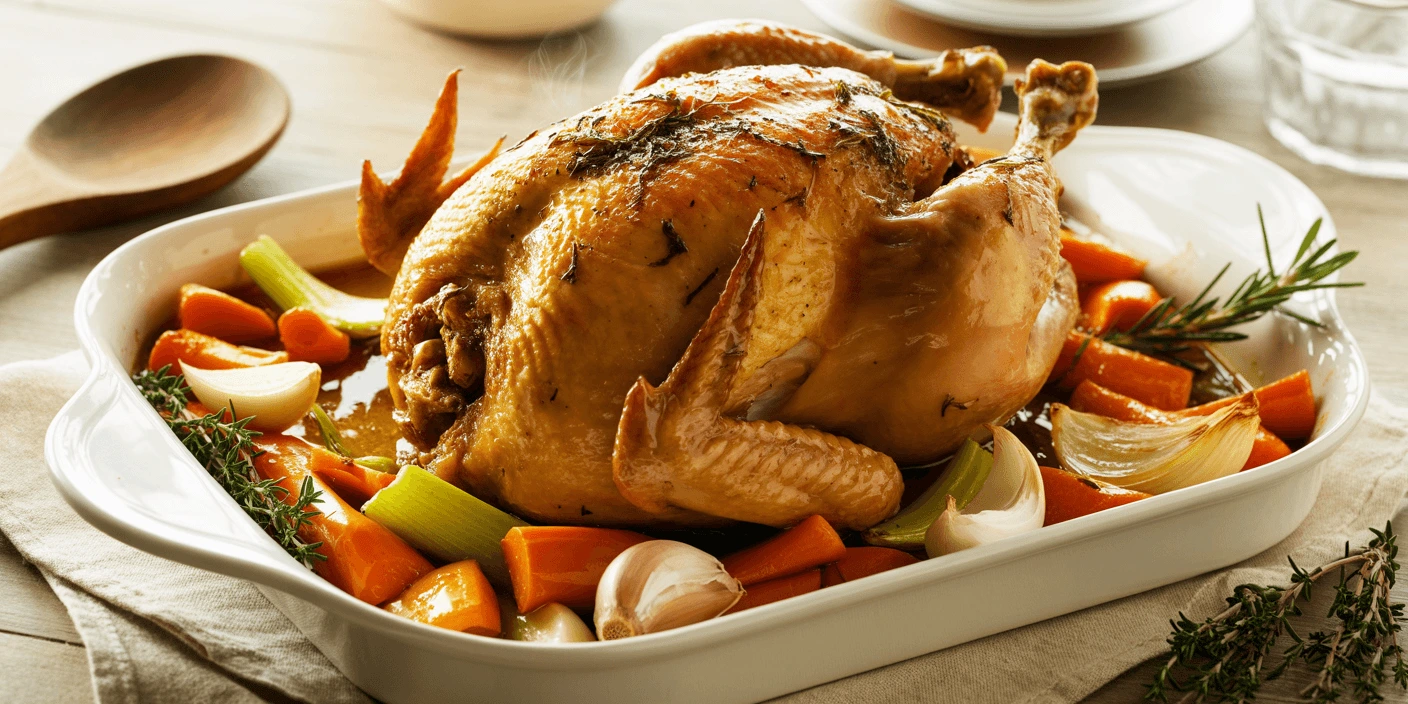
There’s something undeniably comforting about the aroma of a roast chicken wafting through your home. This classic dish balances everyday simplicity with special‑occasion elegance. Whether you’re a beginner or an experienced cook, mastering a perfect roast chicken is a must‑have skill. This guide gives you not only the recipe but also the scientific techniques for crispy skin and juicy meat every time.
Why This Method Works Better Than Others
Most recipes just list ingredients. Our approach focuses on three key techniques:
Dry brining (salting in advance) : Leave the chicken uncovered in the fridge for 24 hours – this dries the skin for maximum crispiness.
Initial high‑heat blast : 425°F (218°C) for 15 minutes, then lower to 375°F.
Mandatory resting : 20 minutes under loose foil so the juices redistribute.
Ingredients & Equipment
Choosing the best chicken
Buy an air‑chilled, free‑range bird if possible. It has better flavor and drier skin. A 4‑lb (1.8 kg) chicken serves 4‑6 people.
Ingredients
1 whole chicken (3–5 lb / 1.5–2.3 kg)
2 tbsp olive oil
1 tbsp fine salt (for dry brining)
1 tsp black pepper
1 tsp sweet paprika
4 garlic cloves, crushed
1 lemon, quartered
A few sprigs of thyme or rosemary
Optional vegetables : onions, carrots, potatoes for the roasting pan
Equipment
Roasting pan or cast‑iron skillet
Meat thermometer
Paper towels
Wire cooling rack (optional but recommended)
Step‑by‑Step Preparation
1. Dry brine – 24 hours ahead
The day before : Pat the chicken completely dry with paper towels. Mix salt, pepper, and paprika, then rub all over the outside and inside. Place the chicken on a rack over a tray, uncovered, in the fridge. This dries the skin.
2. Remove from fridge and stuff
On cooking day, take the chicken out 30 minutes before roasting. Stuff the cavity with garlic, lemon, and herbs. Brush the skin with olive oil.
3. High‑heat start
Preheat oven to 425°F (218°C). Place the chicken on a bed of chopped vegetables in the pan. Roast for 15 minutes.
4. Lower the temperature
Without opening the door, reduce heat to 375°F (190°C) and continue roasting according to the table below.
Roasting time table (after the first 15 minutes at 425°F)
| Chicken weight | Total time at 375°F |
|---|---|
| 3 lb (1.4 kg) | 45–50 min |
| 4 lb (1.8 kg) | 60–70 min |
| 5 lb (2.3 kg) | 75–85 min |
5. Check for doneness
Insert a meat thermometer into the thickest part of the thigh (not touching bone). It should read 165°F (74°C). The juices should run clear.
6. Rest – absolutely essential
Remove the chicken from the oven, place it on a cutting board, and tent loosely with foil. Rest for 20 minutes. This step is non‑negotiable – it keeps the meat juicy.
7. Carve and serve
Carve your beautifully roasted chicken and serve with the roasted vegetables and pan juices. You can also deglaze the pan with broth to make a quick gravy.
Pro Tips – Troubleshooting Table
| Problem | Solution |
|---|---|
| Skin not crispy | Not dry enough – next time, leave uncovered in fridge for 24h. |
| Dry breast, undercooked thighs | Cover the breast with foil after 30 minutes. Or spatchcock (cut out backbone) for even cooking. |
| Vegetables burning | Add a splash of water or broth. Cut veggies into large chunks. |
| Chicken not browning | Brush with a mix of honey and melted butter during last 15 minutes. |
Storage & Leftovers
After the meal, remove remaining meat from the bones within two hours. Store in an airtight container in the fridge for up to 4 days. For best results, keep white and dark meat separate.
Reheating : Avoid the microwave. Place chicken in a covered baking dish with a splash of broth, then warm in a 325°F (165°C) oven for 10‑15 minutes.
Freezing : Wrap portions tightly and freeze for up to 3 months. Thaw overnight in the fridge before reheating.
Don’t throw away the carcass! Make homemade stock – it’s far better than store‑bought. Simmer the bones with water, vegetables, and bay leaves. Refrigerate for 5 days or freeze for 3 months.
Variations
Flavor Profiles and Dietary Adaptations
– Lemon-Herb: Enhance the classic version by increasing the lemon to two whole lemons (one in the cavity, one sliced under the skin) and doubling the herbs for a Mediterranean-inspired variation.
– Garlic-Parmesan: Create a paste with 8-10 cloves of roasted garlic, ¼ cup grated Parmesan cheese, and olive oil. Spread this mixture under the skin before roasting for a rich, Italian-influenced flavor.
– Spicy Southwest: Replace the traditional herbs with a rub of cumin, chili powder, oregano, and lime zest for a vibrant Southwestern twist.
– Asian-Inspired: Marinate the chicken for 4 hours in a mixture of soy sauce, honey, ginger, garlic, and five-spice powder before roasting.
Dietary Considerations
– Dairy-Free: Simply substitute the butter with additional olive oil or dairy-free butter alternatives. Coconut oil also works wonderfully, adding a subtle sweetness.
– Gluten-Free: This recipe is naturally gluten-free, but always check your spice blends if you’re using pre-mixed options, as some contain gluten as anti-caking agents.
– Lower Sodium: Reduce salt by half and compensate with additional herbs and lemon zest to maintain flavor complexity without the sodium content.
More Recipes from Tasty Dinner Recipes
🍗 Honey Garlic Chicken Wings – Sticky & Delicious – perfect as an appetizer
🍝 Creamy Cajun Chicken Pasta – for a complete dinner
💍 Marry Me Chicken – creamy sun‑dried tomato chicken
For more on the spatchcock technique (butterflying the chicken to cook faster and more evenly), read this detailed guide :
Serious Eats – Spatchcock Roast Chicken
Frequently Asked Questions
Q: Why isn’t my chicken skin getting crispy?
A: Three common culprits: First, the chicken wasn’t thoroughly dried before roasting. Second, your oven may not be hot enough (always preheat fully). Third, you might be opening the oven door too frequently, causing temperature fluctuations.
Q: How can I tell when my chicken is done without a thermometer?
A: Pierce the thickest part of the thigh with a knife – if the juices run clear (not pink), it’s likely done. Also, the legs should move easily in their sockets, and the meat should feel firm but not hard when pressed.
Q: Is it necessary to truss the chicken?
A: While not absolutely necessary, trussing helps the chicken maintain its shape and cook more evenly. If you don’t have kitchen twine, even tucking the wings underneath and closing the cavity with the legs will improve your results.
Q: Can I stuff my roast chicken?
A: While possible, stuffing increases cooking time and risks uneven cooking. For food safety, any stuffing must reach 165°F (74°C), which often means overcooked breast meat. It’s generally better to prepare stuffing separately and add aromatics to the cavity instead.
Join the Team Vote!
What’s your favorite way to enjoy roast chicken?
🍗 Plain with pan juices
🧄 Lemon & garlic sauce
🌶️ Spicy (cayenne or chili)
Leave a comment below with your pick + why!
Conclusion
Mastering a roast chicken recipe is one of the most rewarding cooking skills. The beauty lies in its versatility – once you understand the basics, you can adapt it endlessly.
Each time you roast a chicken, you’ll sharpen your instincts for timing, temperature, and doneness. Don’t worry if your first attempt isn’t perfect – focus on the process and enjoy the learning.
Make this recipe your own. Experiment with herbs, spices, or different cooking vessels. With this perfect roast chicken recipe, you’ll never go back to store‑bought rotisserie chicken. After you try it, share your results in the comments. What tweaks did you make? What sides did you serve? Your version might inspire another home cook.