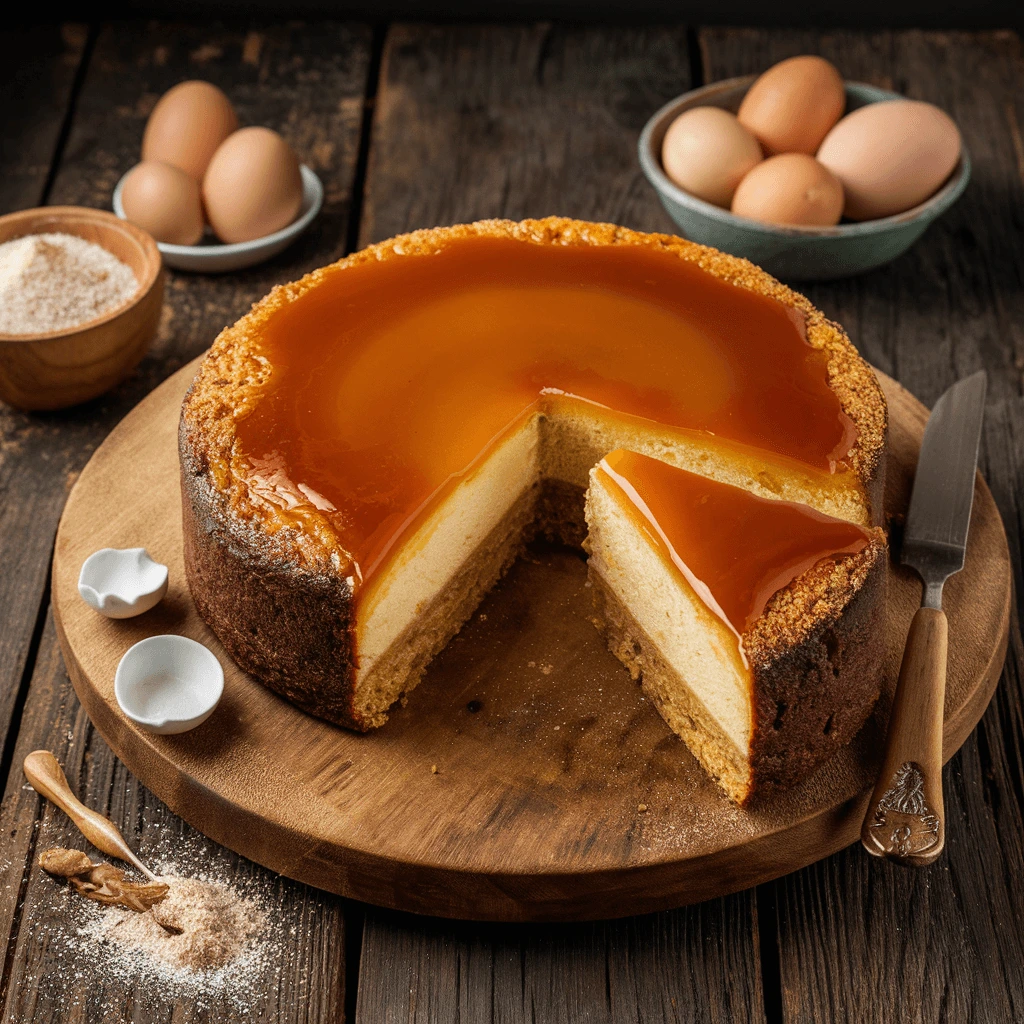
Are you looking for a dessert that will amaze your guests with its magical layers and decadent salted caramel flavor? The Magic Cake with Salted Butter Caramel is the answer to your dessert dreams. This extraordinary cake creates three distinct layers from just one batter – a dense custard base, a creamy middle, and a light, airy top – all crowned with homemade salted butter caramel that melts in your mouth.
Perfect for both novice and experienced bakers, this delicious caramel cake balances sweetness with a hint of salt for an unforgettable taste experience. Let’s explore how to create this showstopping dessert that’s certain to become your new favorite homemade cake recipe.
The Science Behind the Magic Cake’s Three Layers
What makes this cake truly magical is how one simple batter separates during baking to create three distinct textures. The science behind this moist cake is fascinating:
- The bottom layer becomes dense and fudgy, similar to a rich custard
- The middle transforms into a creamy, pudding-like texture
- The top bakes into a light, airy cake layer with a delicate crumb
The key to this magical transformation lies in the temperature of the ingredients and the low baking temperature. The egg yolks and whites are separated, with the whites beaten to stiff peaks, then gently folded into the batter. During baking, the different densities of the ingredients naturally separate, creating this spectacular layered effect.
Essential Ingredients for Perfect Salted Butter Caramel
The crown jewel of this delicious dessert is undoubtedly the salted butter caramel. Unlike store-bought versions, homemade caramel delivers an incomparable depth of flavor. Here’s what makes this caramel special:
Key Components for Authentic Salted Caramel
- Quality butter: Using high-fat, European-style butter creates a richer, more complex caramel flavor
- Sea salt flakes: Provides perfect contrast to the sweetness while enhancing the buttery notes
- Heavy cream: Adds silky texture and prevents crystallization
- Vanilla extract: Introduces subtle aromatic notes that complement the caramel’s sweetness
The magic happens when sugar slowly caramelizes, transforming from white crystals to a golden amber liquid with deep, complex flavors. When combined with salted butter, the result is an irresistible sauce that elevates this cake to extraordinary heights.
Quick and Simple Magic Cake Recipe
Ingredients for the Cake Batter
- 4 eggs, separated (room temperature)
- 150g (3/4 cup) granulated sugar
- 1 tablespoon water
- 125g (1/2 cup + 1 tablespoon) unsalted butter, melted
- 115g (3/4 cup + 1 tablespoon) all-purpose flour
- 500ml (2 cups) milk, lukewarm
- 1 teaspoon vanilla extract
- Pinch of salt
Ingredients for the Salted Butter Caramel
- 200g (1 cup) granulated sugar
- 90g (6 tablespoons) salted butter, cubed
- 120ml (1/2 cup) heavy cream
- 1 teaspoon sea salt flakes
Step-by-Step Baking Instructions
Preparing the Magic Cake Batter
- Preheat your oven to 150°C (300°F). Grease and line a 20cm (8-inch) square baking pan.
- Separate the eggs, placing whites in one large bowl and yolks in another.
- Beat egg yolks with sugar and water until pale and creamy (about 2-3 minutes).
- Add melted butter and continue beating until well incorporated.
- Add flour gradually while mixing on low speed until smooth.
- Warm the milk until lukewarm (not hot), then slowly add it to the batter along with vanilla extract, mixing gently.
- In a separate bowl, beat egg whites with a pinch of salt until stiff peaks form.
- Gently fold the egg whites into the batter using a spatula. The mixture will look very liquid and somewhat lumpy—this is normal for this unique dessert recipe!
- Pour the batter into the prepared pan and bake for 50-60 minutes until the top is golden and slightly firm to touch with some wobble underneath.
- Allow it to cool completely in the pan before adding the caramel topping.
Creating Perfect Homemade Salted Butter Caramel
- Heat sugar in a medium saucepan over medium heat. Do not stir; instead, gently swirl the pan occasionally until the sugar is completely melted and turns amber (about 8-10 minutes).
- Once caramelized, immediately add butter cubes (be careful as it will bubble vigorously). Stir until butter is completely melted.
- Remove from heat and slowly pour in heavy cream while stirring continuously (mixture will bubble again).
- Add sea salt and stir until smooth.
- Allow to cool slightly until it reaches a pourable consistency, then drizzle over the cooled cake.
- Refrigerate the cake for at least 2 hours before serving to allow flavors to develop and layers to set properly.
Tips for Achieving Perfect Magic Cake Layers
- Room temperature ingredients are crucial for proper layer separation
- Fold egg whites gently to maintain air bubbles that help create the top layer
- Don’t be alarmed by the loose, liquid batter—this is necessary for the magic to happen
- Bake at low temperature (150°C/300°F) to allow proper separation of layers
- Test doneness carefully—the cake should still have some wobble in the center
- Cool completely before adding caramel to prevent melting
Delicious Variations on the Classic Magic Cake
The versatility of this easy dessert makes it perfect for customization. Here are some inspired twists on the traditional magic cake with salted butter caramel:
Seasonal Flavor Adaptations
- Autumn Spice: Add cinnamon, nutmeg, and a touch of cardamom to the batter, then top with caramel and toasted pecans
- Summer Berry: Fold fresh berries into the batter before baking and serve with caramel drizzle and additional fresh berries
- Winter Citrus: Add orange or lemon zest to the batter and garnish with candied citrus peel alongside the caramel
- Chocolate Lover’s Dream: Add cocoa powder to the batter for a chocolate magic cake with salted caramel topping
Elegant Serving Suggestions
For special occasions or when hosting guests, elevate your presentation with these serving ideas:
- Dust with powdered sugar just before serving for an elegant contrast
- Add a scoop of vanilla bean ice cream alongside each slice
- Garnish with edible gold leaf for a truly spectacular presentation
- Serve in individual ramekins for an impressive personal dessert
Storage and Make-Ahead Tips for Your Homemade Cake
This quick dessert actually improves with time as flavors meld and develop. Here’s how to store it properly:
- Refrigerate: Store covered in the refrigerator for up to 3 days
- Freezer-friendly: Freeze individual slices (without caramel) for up to 1 month
- Make-ahead option: Prepare the cake 1-2 days before serving and add caramel just before presentation
- Room temperature serving: For best flavor and texture, remove from refrigerator 30 minutes before serving
FAQs About Magic Cake with Salted Butter Caramel
Why didn’t my magic cake form three distinct layers?
The most common reasons for layers not forming properly include:
- Ingredients were not at room temperature
- Egg whites were not beaten to stiff peaks
- Oven temperature was too high
- Batter was overmixed when folding in egg whites
Try again, ensuring your ingredients are at room temperature and your oven is calibrated correctly at 150°C (300°F).
Can I make this delicious dessert ahead of time?
Absolutely! In fact, this cake tastes even better the next day as flavors develop and meld. Make the cake up to 2 days in advance, but add the caramel topping just a few hours before serving for best results.
Why did my caramel crystallize or become grainy?
Crystallization usually occurs when
- Sugar crystals were present on the sides of the pan
- The mixture was stirred during the initial melting phase
- Temperature fluctuated too much during cooking
For smooth salted butter caramel, avoid stirring the sugar while it melts and ensure all equipment is completely clean before starting.
If you loved this recipe, you’ll definitely want to check out this Salted Caramel Magic Cake
Can I use this homemade caramel sauce for other desserts?
Definitely! This versatile salted butter caramel sauce works wonderfully on ice cream, apple pies, cheesecakes, or as a dipping sauce for fruit. Store extra caramel in an airtight container in the refrigerator for up to 2 weeks.
Is it normal for the magic cake batter to be very runny?
Yes! The loose, liquid consistency of the batter is essential for creating the magic separation during baking. Trust the process – even though it may look too thin, it will transform into three perfect layers in the oven.
Can I make this cake dairy-free or gluten-free?
While traditional magic cake relies on dairy for proper layer formation, you can experiment with:
- Plant-based milk alternatives (almond or oat milk work best)
- Dairy-free butter substitutes
- Gluten-free flour blends (add 1/4 teaspoon xanthan gum if your blend doesn’t include it)
Note that these substitutions may affect the classic three-layer separation somewhat but will still result in a delicious cake.
Why This Simple Recipe Deserves a Place in Your Dessert Rotation
The Magic Cake with Salted Butter Caramel combines simplicity with showstopping results, making it perfect for both everyday treats and special occasions. Its unique texture contrast between the three layers, coupled with the rich flavor of homemade caramel, creates an unforgettable dessert experience that will have everyone asking for your secret recipe.
Whether you’re a seasoned baker or just starting your culinary journey, this magical dessert proves that sometimes the most impressive results come from the simplest techniques. Give this easy dessert a try, and watch as one simple batter transforms into three distinct layers of pure bliss, crowned with the irresistible flavor of salted butter caramel.