This isn’t just another recipe; it’s a foolproof system. We’re revealing the one prep step 90% of home cooks miss, the exact oven temperature for guaranteed tenderness, and the simple spice blend that creates a bark worthy of any smokehouse. Consider this your last rib recipe you’ll ever need.
A Recipe Accessible to Everyone
Equipment
- A small, sharp knife or butter knife: For lifting the silver skin membrane.
- Paper towels: For gripping the membrane and patting the ribs dry.
- A large rimmed baking sheet: To catch any drippings during the long bake
- Aluminum foil: For easy cleanup. Line your baking sheet.
- A small bowl and whisk/fork: For mixing the dry rub.
- Tongs: For safely handling the hot baking sheet and ribs.
- A wire rack: Crucial. Elevating the ribs ensures hot air circulates evenly for perfect cooking all around.
- A basting brush (optional): For applying the BBQ glaze at the end.
Ingredients
- 1 full rack 3-4 lbs / 1.4-1.8 kg pork spare ribs or baby back ribs: Spare ribs are fattier and more flavorful; baby backs are leaner and cook slightly faster.
- 1 tablespoon 15ml yellow mustard or olive oil: Acts as a “glue” for the dry rub. You will not taste the mustard.
- For The Magic Dry Rub The Simple 5-Ingredient Blend:*¼ cup (50g) packed light brown sugar
- 2 tablespoons 14g smoked paprika: Provides that classic BBQ color and smoky depth.
- 1 tablespoon 9g garlic powder
- 1 tablespoon 6g onion powder
- 1 tablespoon 18g fine sea salt: Crucial.
- Do not reduce. It tenderizes and seasons the meat throughout the long cook.1 teaspoon 2g black pepper1 teaspoon (2g) chili powder (optional, for heat)
- ½ cup 120ml of your favorite BBQ sauce: For that final sticky, caramelized finish.
Instructions
- Step 1: The 10-Second Secret – Remove the Membrane
This is the single most important step. Place the rack bone-side up. Slide a butter knife under the thin, translucent membrane at one end of the ribs. Lift it up, grip it with a paper towel for traction, and pull it off in one satisfying piece. If it tears, grip it again and continue. Discard the membrane.
- Step 2: Pat Dry & Apply the Binder
Pat the ribs completely dry with paper towels. This helps the rub stick. Rub a thin, even layer of yellow mustard or olive oil over the entire surface of the ribs (both sides). This is your binder.
- Step 3: Apply the Dry Rub – Be Generous
In a small bowl, whisk together all dry rub ingredients. Sprinkle the rub liberally and evenly over both sides of the ribs, pressing it into the meat with your hands. Don’t be shy.
- Step 4: Low & Slow Bake – The Key to Tenderness
Preheat your oven to 280°F (135°C). This low temperature is critical. Place the ribs bone-side down on a wire rack set inside a foil-lined baking sheet (for easy cleanup). Bake, uncovered, on the middle rack for 2.5 to 3 hours for spare ribs (2 to 2.5 hours for baby backs). The ribs are done when the meat has shrunk back from the bones by about ½ inch and you can easily twist a bone with tongs.
- Step 5: The Glaze & Final Caramelization (Optional)
For a sticky, caramelized finish, brush a generous layer of BBQ sauce over the ribs. Increase oven temperature to 400°F (200°C) and return the ribs to the oven for 5-10 minutes, just until the sauce is bubbly and set. Watch closely to prevent burning.
- Step 6: The MOST Important Step – Rest
Remove the ribs from the oven and let them rest, tented loosely with foil, for 10-15 minutes. This allows the juices to redistribute throughout the meat. Cutting immediately will cause all the juices to run out onto the cutting board.
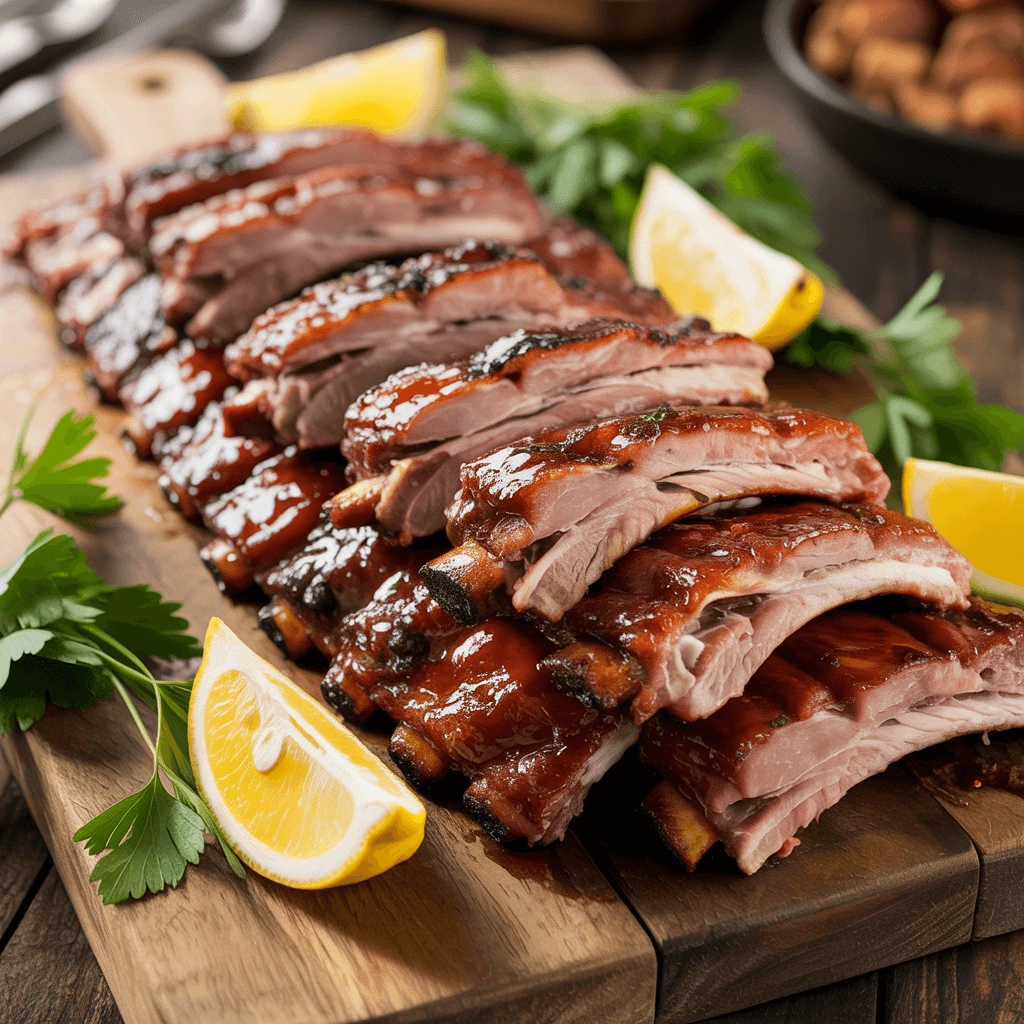
- Step 7: Slice & Serve
Slice the ribs between the bones and serve immediately.
Total Time: 3 hours 15 min (15 min active) | Yield: Serves 4 | Dietary: Gluten-Free
🔬 Why This Oven-Baked Spare Ribs Recipe Works (The Science of Tenderness)
- The 10-Second Membrane Rule: That tough, silvery skin on the bone-side of the ribs is called the membrane. It’s impermeable to smoke, rub, and moisture, trapping fat and steam in a way that steams the meat, making it tough. Peeling it off (our #1 secret) allows fat to render properly and lets seasoning penetrate deep into the meat, ensuring juicy, flavorful ribs.
- “Low & Slow” is Law: Cooking ribs at a consistent, low temperature (280°F / 135°C) is non-negotiable. This gently breaks down tough collagen into gelatin over hours, transforming a tough cut into meltingly tender, fall-off-the-bone meat without ever drying it out. High heat guarantees tough ribs.
- The Spice Rub Trinity: A great dry rub isn’t just flavor—it’s texture. Our blend uses brown sugar for caramelization, paprika for color and sweetness, and salt as a tenderizer. Together, they create a flavorful, slightly crispy “bark” during the long bake.
✅ The Rib Commandments: Pro Tips & Mistakes to Avoid
| ✅ DO THIS FOR PERFECT RIBS | ❌ AVOID THIS COMMON MISTAKE |
|---|---|
| Remove the Membrane: This is non-negotiable for tender ribs. | Don’t Boil the Ribs: Boiling par-cooks them but boils away all their natural flavor and fat, leading to dry, bland ribs. |
| Cook Low & Slow (280°F): This temperature perfectly renders fat and breaks down collagen. | Don’t Cook at High Heat: Baking at 350°F or above will cause the outside to burn before the inside becomes tender. |
| Use a Wire Rack: Elevating the ribs allows hot air to circulate evenly. | Don’t Bake Directly on a Pan: This steams the bottom of the ribs, preventing proper browning and texture. |
| Let Them Rest: Always rest meat after a long cook to retain juiciness. | Don’t Slice Immediately: Sending hot juices straight onto the cutting board is the fastest way to dry ribs out. |
📋 Baked Spare Ribs FAQ
Can I really make Baked Spare Ribs without a grill or smoker?
Absolutely. The “low and slow” oven method at 280°F is designed to mimic the gentle, indirect heat of a smoker, making tender ribs accessible to anyone with an oven.
My membrane is hard to remove. Any tricks?
If it’s stubborn, use the back of a spoon to gently loosen it from one end before gripping it with a paper towel. The key is getting that initial corner lifted.
How do I know when the ribs are done without a thermometer?
Use the “Bend Test” or “Twist Test.” Pick up the rack from one end with tongs. If it bends easily and the surface cracks, it’s done. Alternatively, try to twist a bone; if it moves freely, they’re ready.
What’s the best side dish for ribs?
Classic pairings include The Ultimate Creamy Make-Ahead Mashed Potatoes, a hearty Ultimate Baked Ziti, or simple grilled corn. For a creamy and flavorful side, our Creamy Cajun Chicken Pasta is also a fantastic choice.
How do I store and reheat leftovers?
Store cooled ribs in an airtight container for up to 4 days. Reheat gently, wrapped in foil, in a 250°F oven until warmed through (about 20 minutes). This prevents them from drying out.
📊 Nutrition Information (Per Serving, Approximate, without glaze)
- Calories: 520 kcal
- Fat: 35g
- Saturated Fat: 12g
- Carbohydrates: 10g (from rub)
- Sugar: 8g
- Protein: 40g
🎉 Conclusion: Your New Go-To Rib Recipe
This guide has given you more than steps—it’s provided the why behind each one. You now understand that tenderness comes from preparation (removing the membrane) and patience (low, slow heat). With this knowledge, you can consistently produce ribs that are the star of any table.
We Want to See Your BBQ Masterpiece!
Did this method give you the best ribs of your life? Your experience helps our community grow. Leave a message and tell us about your cook. Share a photo of your glazed, fall-off-the-bone ribs and tag @tastydinnerrecipes on Instagram—we can’t wait to feature your success!
Ready to build your ultimate BBQ spread? Find more family-friendly recipes and menu ideas in our full collection at TastyDinnerRecipes.com.
For daily inspiration that turns cooking from a task into a joy, explore the hundreds of tested, family-approved recipes waiting for you at TastyDinnerrecipes.com.