There’s nothing quite as quintessentially American as a freshly baked apple pie. The irresistible aroma of cinnamon-spiced apples encased in a flaky, golden crust has been comforting generations of dessert lovers. Whether you’re preparing for a holiday gathering, a family dinner, or simply craving a slice of nostalgia, this comprehensive guide will walk you through creating the perfect homemade apple pie from scratch.
The Rich Heritage of Traditional Apple Pie
Before we dive into measuring cups and mixing bowls, let’s appreciate the rich history behind this classic recipe. Apple pie has been a staple in American cuisine since the 1700s, though its origins trace back to European culinary traditions. Early settlers brought apple seeds to America, and as orchards flourished across the country, so did various interpretations of this beloved traditional dessert.
What makes apple pie truly special is its ability to evoke warm memories and create new ones. It’s not just a dessert—it’s a centerpiece that brings people together, a symbol of home and comfort that transcends generations.
Essential Ingredients for a Perfect Apple Pie
The Foundation: Creating a Flaky Pie Crust
The secret to any outstanding homemade pie begins with the crust. A truly exceptional apple pie crust strikes the perfect balance between flakiness and structure. Here’s what you’ll need:
- 2½ cups all-purpose flour
- 1 teaspoon salt
- 1 tablespoon sugar
- 1 cup cold unsalted butter, cubed
- ¼ to ½ cup ice water
- 1 tablespoon apple cider vinegar (optional, for extra tenderness)
The key to a flaky crust lies in keeping your ingredients cold and handling the dough minimally. The small pockets of cold butter create steam during baking, resulting in those coveted flaky layers that make a homemade crust superior to store-bought alternatives.
The Star of the Show: Selecting the Best Apples
Not all apples are created equal when it comes to baking. The best apple pie relies on selecting varieties that maintain their structure while becoming tender during baking. Here are some excellent choices:
- Granny Smith: Tart and firm, providing a perfect contrast to sweet elements
- Honeycrisp: Crisp texture with a honey-sweet flavor
- Braeburn: Offers a balanced sweet-tart profile
- Jonagold: Sweet with slightly tart notes
- Northern Spy: A heritage variety perfect for baking
For the most complex flavor profile in your apple dessert, consider using a combination of varieties. A mix of tart and sweet apples creates depth of flavor that a single variety cannot achieve.
The Supporting Cast: Spices and Sweeteners
The warm spices in apple pie are what transform simple ingredients into a comfort food masterpiece:
- ¾ cup granulated sugar (adjust based on the sweetness of your apples)
- ¼ cup brown sugar (for caramel notes)
- 2 tablespoons all-purpose flour
- 1 tablespoon cornstarch
- 1½ teaspoons ground cinnamon
- ¼ teaspoon ground nutmeg
- ⅛ teaspoon ground allspice
- ⅛ teaspoon ground cardamom (optional, for complexity)
- ¼ teaspoon salt
- 1 tablespoon lemon juice
- 1 teaspoon vanilla extract
These ingredients work together to enhance the natural sweetness of the apples while adding depth and complexity to your classic apple pie.
Step-by-Step Apple Pie Preparation
Preparing the Perfect Pie Dough
- Combine dry ingredients: In a large bowl, whisk together flour, salt, and sugar.
- Cut in butter: Using a pastry cutter, two knives, or your fingertips, work the cold butter into the flour mixture until it resembles coarse crumbs with some pea-sized pieces remaining.
- Add liquid: Drizzle ice water mixed with apple cider vinegar (if using) over the mixture, 1 tablespoon at a time, stirring gently with a fork until the dough begins to come together.
- Form and chill: Divide the dough into two equal portions, shape into disks, wrap in plastic, and refrigerate for at least 1 hour or overnight. This resting period allows the gluten to relax and the moisture to distribute evenly.
A well-rested dough is easier to roll and results in a more tender pie crust, essential for any American classic dessert.
Preparing the Apple Filling
- Peel and slice apples: Peel, core, and slice 6-7 large apples (about 3 pounds) into ¼-inch slices. Consistency in thickness ensures even cooking.
- Combine with flavors: Toss apple slices with lemon juice to prevent browning, then add both sugars, flour, cornstarch, and spices. Mix gently but thoroughly to coat.
- Let macerate: Allow the mixture to sit for 30 minutes. This draws out some moisture from the apples and begins dissolving the sugar, creating a rich sauce.
This method ensures your apple filling will be perfectly balanced—not too runny, not too firm, with apples that maintain their shape while becoming tender.
Assembling and Baking Your Apple Pie
- Preheat: Set your oven to 425°F (220°C) with a rack in the lower third position.
- Roll the bottom crust: On a floured surface, roll one disk of dough to about 12 inches in diameter. Transfer to a 9-inch pie dish, letting the edges hang over.
- Fill the pie: Arrange the apple mixture in the crust, mounding slightly in the center. Dot with 2 tablespoons of butter cut into small pieces.
- Add the top crust: Roll the second disk and place over the filling. Trim excess dough to about ½ inch overhang, then fold the edges under and crimp decoratively.
- Ventilate: Cut several slits in the top crust to allow steam to escape.
- Glaze: Brush with an egg wash (1 egg beaten with 1 tablespoon water) for a golden shine, and sprinkle with coarse sugar if desired.
- Bake strategically: Place on a baking sheet and bake at 425°F for 20 minutes, then reduce temperature to 375°F (190°C) and continue baking for 40-45 minutes until golden brown and bubbling.
- Cool completely: Allow the pie to cool on a wire rack for at least 3 hours before slicing to let the filling set.
This careful approach to baking ensures your homemade apple pie will have a perfectly cooked filling and a beautifully browned crust—hallmarks of a truly exceptional pie experience.
Creative Variations on the Classic Apple Pie
Streusel-Topped Apple Pie
For those who prefer a crumbly, sweet topping to a second crust, a streusel or Dutch apple pie offers a delightful alternative:
- ¾ cup all-purpose flour
- ½ cup brown sugar, packed
- ½ cup rolled oats
- 1 teaspoon cinnamon
- ⅛ teaspoon salt
- ½ cup cold butter, cubed
Combine these ingredients until crumbly, then top your apple filling instead of using a second crust. This variation offers a wonderful textural contrast to the tender apples beneath.
Caramel Apple Pie
Elevate your classic pie with the addition of rich caramel:
- Drizzle ⅓ cup of caramel sauce over the apples before adding the top crust.
- After baking and cooling, drizzle additional caramel over slices when serving.
- For the ultimate sweet tooth satisfaction, add a scoop of vanilla ice cream and another drizzle of warm caramel.
Chai-Spiced Apple Pie
For a warming twist on traditional fall flavors:
- Replace standard spices with 2 teaspoons of chai spice blend (cardamom, cinnamon, ginger, cloves, and black pepper).
- Add 1 tablespoon of finely minced crystallized ginger to the filling.
- Steep 2 chai tea bags in 2 tablespoons of hot water, cool, and add to the filling for an extra flavor dimension.
Expert Tips for Pie Perfection
Preventing the Dreaded Soggy Bottom
No one enjoys a soggy pie crust. Here are foolproof techniques to ensure your bottom crust remains crisp:
- Blind bake: For extra insurance, partially pre-bake your bottom crust with pie weights for about 15 minutes.
- Create a barrier: Brush the bottom crust with egg white or sprinkle with a mixture of equal parts sugar and flour before adding filling.
- Use a metal or glass pie plate: These conduct heat better than ceramic, helping the bottom crust cook properly.
- Bake on a preheated baking sheet or pizza stone: This provides immediate heat to the bottom of the pie.
These simple steps will help you achieve the perfect texture in your homemade dessert.
Decorative Crust Techniques
Take your pie baking to the next level with these artistic approaches:
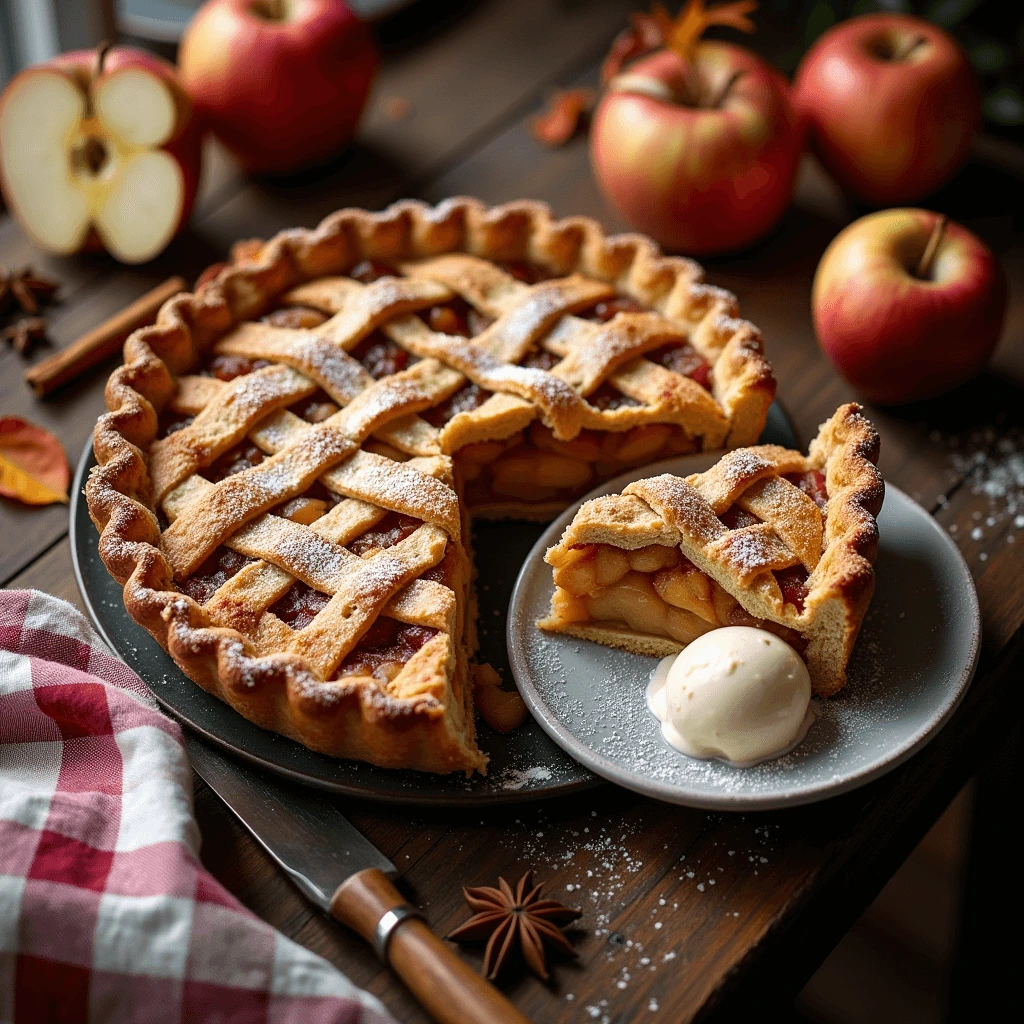
- Lattice top: Create a classic woven pattern for a traditional look.
- Braided edge: Form small braids with excess dough and press around the rim.
- Cookie cutter shapes: Cut small shapes from the top crust dough and arrange them decoratively.
- Leaf designs: Create realistic leaf shapes and arrange them in a spiral or other pattern.
Remember to brush your decorative elements with egg wash for a professional-looking shine that will make your apple pie as beautiful as it is delicious.
Make-Ahead and Storage Strategies
Easy baking often means planning ahead:
- Dough preparation: Pie dough can be refrigerated for up to 3 days or frozen for up to 3 months.
- Filling preparation: The apple filling can be made a day ahead and refrigerated.
- Whole pie storage: Baked pie can be kept at room temperature for 2 days or refrigerated for up to 5 days.
- Freezing options: Unbaked pies freeze beautifully for up to 3 months. Bake directly from frozen, adding 15-20 minutes to the baking time.
With these strategies, you can enjoy homemade apple pie even during your busiest seasons.
If you love this recipe, check out similar ones here
Serving Suggestions and Pairings
Classic Accompaniments
Nothing complements a warm slice of apple pie quite like:
- Vanilla ice cream (à la mode)
- Freshly whipped cream
- Sharp cheddar cheese (a traditional New England pairing)
- Warm custard sauce
Beverage Pairings
Enhance your dessert time with these perfect beverage matches:
- Hot apple cider
- Coffee or espresso
- Sweet dessert wine like Sauternes or ice wine
- Bourbon or whiskey
- Chai tea
FAQs About Apple Pie Baking
How do I know when my apple pie is done?
Your homemade apple pie is done when the crust is deeply golden brown and you can see thick bubbles of filling simmering through the vents or lattice. If using a glass pie plate, check that the bottom crust has also browned. The internal temperature should reach about 175°F if you’re using a thermometer.
Why is my apple pie filling watery?
Watery filling typically occurs for a few reasons:
- The apples weren’t macerated before baking
- Not enough thickener was used
- The pie was cut before cooling completely
- The varieties of apples used release too much juice during baking
Try using a mix of apple varieties and adding an extra tablespoon of cornstarch to your classic recipe if you consistently experience this issue.
Can I use frozen apples for my pie?
Yes, frozen apples can work in a pinch. Thaw them completely first, drain any excess liquid, and you may need to add extra thickener since frozen apples tend to release more moisture when baked. However, fresh apples will always provide the best texture for a truly exceptional apple dessert.
How do I prevent the edges of my crust from burning?
If you notice the edges browning too quickly during baking, shield them with aluminum foil or a pie shield. Apply this protection about halfway through the baking time to allow the edges to brown properly first without burning.
What’s the secret to a flaky pie crust?
The secrets to a flaky crust include:
- Using very cold ingredients
- Handling the dough minimally
- Allowing the dough to rest in the refrigerator
- Leaving visible pieces of butter in the dough
- Not adding too much water
Following these principles will help you achieve the perfect texture for your homemade pie crust.
Can I reduce the sugar in the recipe?
Yes, you can reduce the sugar by up to one-third without significantly affecting the texture of the filling. If using particularly tart apples, you might want to maintain the sugar levels for balance. For a natural alternative, consider substituting some of the sugar with maple syrup or honey for a different flavor profile in your apple pie.
Conclusion
Creating a truly magnificent apple pie is an achievable art that combines simple ingredients with thoughtful technique. From selecting the perfect apples to mastering the flaky crust, each step contributes to a homemade dessert that carries tradition forward while creating new memories around your table.
Whether you’re a seasoned baker or trying your hand at pie-making for the first time, this comprehensive guide gives you everything needed to create a classic American dessert that will delight family and friends for years to come. Remember, the best apple pies are made with patience, attention to detail, and most importantly, love for the craft of baking.
So preheat your oven, roll up your sleeves, and embrace the wonderful tradition of apple pie making. Your efforts will be rewarded with not just a delicious dessert, but with the joy and satisfaction that comes from creating something truly special from scratch.