
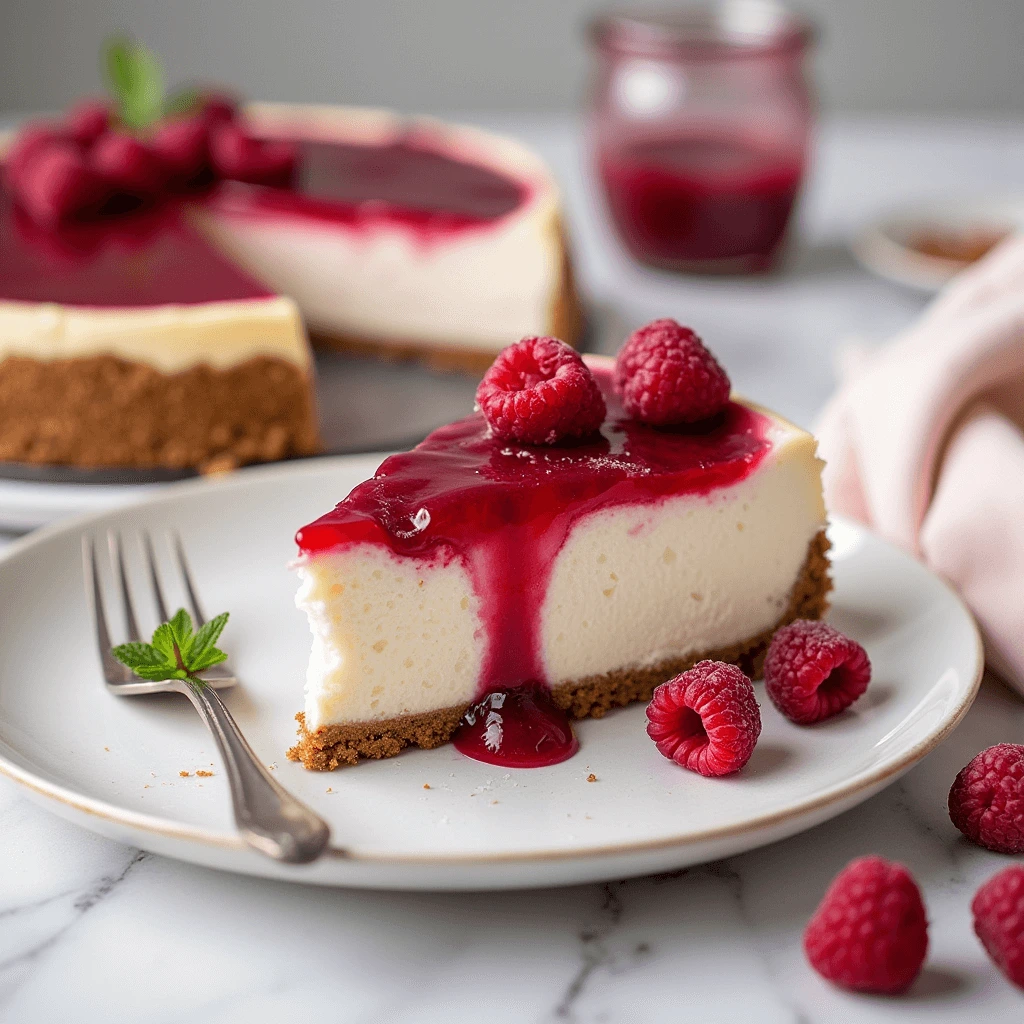
No-Bake Raspberry Cheesecake
Equipment
- 9-inch springform pan
- Food processor (or ziplock bag + rolling pin)
- Electric mixer
- Offset spatula
- Fine mesh sieve
Ingredients
1: Graham Cracker Crust
250g | | graham cracker crumbs
100g | | unsalted butter, melted
3 tbsp | | granulated sugar
pinch | | salt
2: Cheesecake Filling
600g | | full-fat cream cheese, softened
200g | | granulated sugar
2 tsp | | pure vanilla extract
1 tbsp | | fresh lemon juice
300ml | | heavy whipping cream (35% fat), cold
15g | | powdered gelatin
60ml | | cold water
3: Raspberry Topping:
300g | | fresh raspberries (+ extra for garnish)
75g | | granulated sugar
2 tbsp | | fresh lemon juice
7g | | powdered gelatin
3 tbsp | | cold water
Instructions
- Instruction 1: Line 9-inch springform pan with parchment. Crush graham crackers.
- Instruction 2:Mix crumbs, melted butter, 3 tbsp sugar, salt. Press firmly into pan bottom. Chill 30 min.
- Instruction 3Bloom 15g gelatin in 60ml cold water (5 min). Microwave 10-15 sec to dissolve. Cool slightly.
- Instruction 4Beat cream cheese + 200g sugar until smooth. Add vanilla, lemon juice.
- Instruction 5Whip cold cream to stiff peaks. Fold into cream cheese mixture with gelatin.
- Instruction 6Pour over crust. Chill 2+ hours until firm.
- Instruction 7For topping: Cook 250g raspberries, 75g sugar, 2 tbsp lemon juice 4-5 min. Strain seeds.
- Instruction 8Bloom 7g gelatin in 3 tbsp water. Stir into warm raspberry sauce. Cool to room temp.
- Instruction 9Arrange fresh raspberries on set cheesecake. Pour cooled sauce over. Chill 4+ hours.
Notes
This no-bake raspberry cheesecake features a rich, creamy filling on a buttery graham cracker crust, topped with a vibrant raspberry sauce and fresh raspberries. Quick and easy to make, it’s a perfect dessert without the need for baking.
Indulge in the creamy decadence of a perfect no-bake raspberry cheesecake that combines the tangy sweetness of fresh raspberries with the smooth richness of cream cheese. This No-Bake Raspberry Cheesecake recipe requires zero oven time, making it the perfect dessert for warm summer days or when you’re craving something sweet without the hassle of baking.
Total Time: 45 minutes preparation + 6 hours chilling | Servings: 12 slices | Difficulty: Easy
Why No-Bake Raspberry Cheesecake Deserves a Spot in Your Dessert Repertoire
In today’s fast-paced world, finding time to create elaborate desserts can be challenging. That’s where the beauty of a no-bake cheesecake shines. This raspberry cheesecake without baking combines simplicity with elegance, allowing you to create a show-stopping dessert with minimal effort. Whether you’re hosting a dinner party or simply treating yourself, this no-bake raspberry delight promises to impress.
The French-inspired No-Bake Raspberry Cheesecake brings together the best of both worlds: the sophisticated flavor profile of a traditional cheesecake with the convenience of a no-bake preparation method. Let’s dive into what makes this dessert so special and how you can create it in your own kitchen.
Why You’ll Love This Recipe
✅ Make-Ahead Friendly – Prepare up to 2 days in advance for stress-free entertaining</strong></strong></strong>
The Perfect Balance of Flavors in No-Bake Raspberry Desserts
What makes this No-Bake Raspberry Cheesecake truly exceptional is the harmonious balance between the creamy cheesecake filling and the bright, tangy raspberry topping. Unlike baked versions, this no-bake raspberry cheesecake maintains a lighter, more refreshing profile that’s perfect for serving after a hearty meal or as a cool treat on warm days.
The raspberry component adds not only vibrant color but also a natural sweetness that complements the subtle tanginess of the cream cheese. This creates a multi-dimensional flavor experience that’s both sophisticated and approachable.
Nutritional Information (Per Serving)
| Nutrient | Amount | % Daily Value* |
|---|---|---|
| Calories | 420 kcal | 21% |
| Total Fat | 28g | 36% |
| Saturated Fat | 16g | 80% |
| Cholesterol | 85mg | 28% |
| Sodium | 320mg | 14% |
| Total Carbohydrates | 35g | 13% |
| Dietary Fiber | 2g | 7% |
| Total Sugars | 25g | 50% |
| Protein | 5g | 10% |
| Vitamin C | 10mg | 11% |
| Calcium | 75mg | 6% |
How to Serve & Slice Perfectly
- Unmold: Run a thin, hot knife around the edge of the springform pan before releasing the clamp. Carefully lift off the ring.
- Transfer: Slide a large spatula or cake lifter under the parchment paper to transfer the cheesecake to a serving plate.
- Clean Slices: For picture-perfect slices, dip a sharp knife in hot water and wipe it clean between each cut.
- Garnish: Just before serving, garnish with additional fresh raspberries, mint leaves, and a light dusting of powdered sugar if desired.
Cheesecake Troubleshooting Common Issues
- Too soft? Add additional gelatin next time (1 extra teaspoon)
- Not setting properly? Ensure proper refrigeration time and temperature
- Crust too crumbly? Add a bit more melted butter to help it bind
- Topping too runny? Allow it to cool more before pouring over the cheesecake
Serving Suggestions
This No-Bake Raspberry Cheesecake is a versatile dessert that can be presented in multiple ways:
- Slice into elegant wedges and serve on chilled dessert plates
- Create individual mini cheesecakes in glass jars for a modern presentation
- Add a dusting of powdered sugar just before serving for extra visual appeal
- Pair with a small scoop of vanilla ice cream for an indulgent treat
- Garnish with fresh raspberries, mint leaves, and a light drizzle of raspberry coulis
The beauty of this no-bake raspberry cheesecake lies in its versatility. It can be prepared up to two days in advance, making it perfect for entertaining or when you want to plan ahead.
Dietary Adaptations
- Gluten-Free: Use certified gluten-free graham crackers or cookies for the crust.
- Lower Sugar: Reduce sugar in both filling and topping by 25%, adding a touch of stevia or monk fruit sweetener to taste.
- Dairy-Free: Substitute with plant-based cream cheese and coconut cream (the thick part from a can of full-fat coconut milk).
- Vegetarian/Vegan: Replace gelatin with agar-agar powder, using about ¾ of the amount (as it sets firmer).
Keto & Gluten-Free Version (5g net carbs per slice)
Transform this classic into a keto-friendly dessert with 3 simple swaps:
**Crust: Replace graham cracker crumbs with 250g (2½ cups) **almond flour** + 100g melted butter (no gluten, 2g net carbs total).
Sweeteners: Swap all granulated sugar for **erythritol** or **monk fruit sweetener** (0g net carbs):
– Filling: 200g → 150g erythritol
– Topping: 75g → 50g erythritol
– Crust: 3 tbsp → 2 tbsp erythritol
Result: Same creamy texture, 4g net carbs per slice (vs 35g original). Perfect for your “Keto, Gluten-Free & Low-Carb” category!
New Nutrition (per slice): 320 kcal | 28g fat | **4g net carbs** | 6g protein
Frequently Asked Questions About No-Bake Raspberry Cheesecake
Can I Use Frozen Raspberries for This Cheesecake Framboise Sans Cuisson?
Yes, frozen raspberries work well for the topping. Thaw them completely and drain excess liquid before using. For the decorative raspberries on top, fresh is still preferable for the best visual appeal and texture.
How Long Does No-Bake Raspberry Cheesecake Last?
When stored properly in the refrigerator, this no-bake raspberry cheesecake will maintain its quality for up to 5 days. Keep it covered to prevent it from absorbing other flavors from the refrigerator and to maintain its moisture.
Can I Freeze This No-Bake Cheesecake?
Absolutely! This Cheesecake Framboise Sans Cuisson freezes beautifully for up to 2 months. Wrap it tightly in plastic wrap and then aluminum foil before freezing. Thaw overnight in the refrigerator before serving.
What Can I Substitute for Gelatin in This Recipe?
For vegetarian options, agar-agar powder can be used as a 1:1 substitute for gelatin. Keep in mind that agar sets more firmly than gelatin, so you might want to use slightly less (about ¾ of the amount called for in the recipe).
Why Did My Cheesecake Not Set Properly?
There are several potential reasons:
- The gelatin wasn’t properly bloomed or dissolved
- The cheesecake didn’t chill long enough
- The ratio of liquid to gelatin was off
- The cream wasn’t whipped to stiff peaks before folding in
If you enjoyed this recipe, I invite you to Discover more easy no‑bake desserts.
Can I Make Individual Raspberry Cheesecakes Instead of One Large One?
Certainly! This recipe works wonderfully in individual ramekins, mason jars, or glasses. Adjust the chilling time to about 3-4 hours for smaller portions.
How Do I Achieve the Perfect Smooth Topping?
For a professional-looking finish, pour the raspberry topping over the back of a spoon onto the cheesecake to prevent it from creating a divot in the soft cheesecake layer.
What’s the Secret to a Perfect No-Bake Cheesecake Texture?
The key is properly whipped cream and the right amount of gelatin. Too little gelatin and the cheesecake won’t hold its shape; too much and it becomes rubbery. The recipe proportions have been tested to provide the perfect balance.
Variations & Creative Twists
- Mixed Berry Cheesecake: Replace half the raspberries with strawberries, blueberries, or blackberries.
- Lemon-Raspberry: Add 1 tbsp of lemon zest to the filling for a brighter citrus note.
- Chocolate Crust: Substitute 50g of the graham crumbs with chocolate cookie crumbs.
- White Chocolate Drizzle: Melt 50g white chocolate and drizzle over the set raspberry layer before serving.
- Adult Version: Add 1 tbsp of Chambord (raspberry liqueur) to the raspberry sauce.
Conclusion & Final Thoughts
The No-Bake Raspberry Cheesecake represents the perfect balance of convenience and sophistication. By eliminating the need for baking while maintaining the luxurious texture and flavor of a traditional cheesecake, this recipe offers a stress-free approach to creating a stunning dessert.
Whether you’re a seasoned baker looking for a quick alternative or a novice in the kitchen seeking a foolproof recipe, this no-bake raspberry cheesecake delivers consistent results with minimal effort. The vibrant color contrast between the creamy white filling and the ruby-red raspberry topping creates a visual masterpiece that’s sure to impress any audience.
So the next time you’re craving something sweet or need a reliable dessert for a special occasion, turn to this No-Bake Raspberry Cheesecake recipe. It’s more than just a dessert; it’s a celebration of simple ingredients transformed into something extraordinary – no oven required.
Ready to make it? Save this recipe, gather your ingredients, and prepare to receive compliments on your beautiful, delicious creation!
Comments are closed.